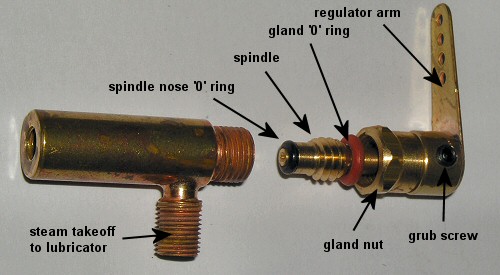
Exploded view of the current radio controlled steam regulator.
Roundhouse locomotives use two different types of steam regulator for manual and radio controlled models. The manual regulator is a simple needle valve that requires little maintenance however, the r/c version uses an internal '0' ring to ensure that the servo closes the valve fully, and will require periodic adjustment and may also need cleaning or replacing from time to time.
The steam regulator seal can become contaminated with dirt or lime scale or, after a period of time, become worn or compressed so that when the lever on the radio control is fully closed, the locomotive still moves. To overcome this, a trimmer is fitted to the transmitter. On some transmitters, this is the small lever at the side of the main control lever and is set at the factory to the top of its slot. As wear takes place in the regulator, it can slowly be moved down the slot to compensate. When it reaches the bottom, it is time to reset it to the top and adjust the linkage between the servo and the regulator in the cab.
Some later sets use digital adjustment and the r/c instruction booklet will have details on how to adjust trim. If in doubt, please contact the factory for further information.
To adjust the linkage, proceed as follows. Note that access to the steam regulator will vary on different models. Some are easily reached by simply lifting up the roof though some may require that the boby, cab or roof is removed.
Switch on the radio transmitter and receiver then place the left hand trimmer on the transmitter to the top of it's slot and the control lever to the bottom. This will place the steam regulator on it's normally closed position.
Check the loco under steam and see if the regulator now closes correctly. If not, repeat the above, making sure that the regulator spindle does not move at step 1.
If adjustment does not cure this problem, the internal '0' ring may be dirty or damaged and requires replacement as follows.
Exploded view of the current radio controlled steam regulator.
Disconnect the linkage between the servo and the regulator arm. On many models, it is convenient to slacken the clamp screw on the push rod connector at the outer end of the regulator arm, leaving the arm fixed to the regulator spindle, but see note later.
Unscrew the gland nut untill it touches the boss of the regulator arm then start to screw out the spindle. NOTE, if there is insufficient space for the regulator arm to rotate fully, it must be removed from the spindle by loosening the grub screw(s) but it makes re-setting easier if it can be left in place.
If the arm is still attached, screw the spindle out and unscrew the gland nut together and untill the spindle comes right out of the regulator body.
If the regulator arm has been removed, unscrew the gland nut and slide it back on the spindle then unscrew the spindle to remove it.
The spindle nose '0' ring will now be seen and can be checked for dirt or damage.
If there is dirt or particles of lime scale present, clean it thoroughly or preferably replace it.
Clean the inside of the regulator body with a cotton bud or twisted paper towel, to remove any dirt from the valve seat.
Put a few drops of steam oil on the spindle threads and around the gland '0' ring and assemble in reverse order to above.
Screw the spindle in untill you feel the '0' ring touch the internal valve seat. If the regulator arm was not removed, set it to roughly the position that it was originally and re-connect the linkage. If the regulator arm was removed, once you feel the '0' ring touch the seat, screw it in a further 5 or 10 degrees then attach the arm and linkage without moving the spindle.
The gland nut should be screwed down finger tight to start with. It can be checked for steam leaks during the next stage but should only be tightened enough to stop any leak. Overtightening will cause a stiff regulator and can damage the '0' ring.
Final adjustment is done under steam as described earlier. Aim to get the regulator starting to open (loco just beginning to move) when the control arm on the transmitter has moved about 1/4 to 1/3 of the way up from the closed position.
Periodic oiling of the gland will help keep the regulator working freely. Place a spot of steam oil between the gland nut and the regulator arm and work the regulator a few times
Roundhouse Engineering Co. Ltd., Doncaster, UK. 2018. Click Here To Return To The Homepage