The tiny jet in these units can become blocked by small particles of dirt making the burner difficult to light, burn weakly at normal operating temperatures*, burn in the smokebox or fail completely. If any of these should happen, clean out the jet as follows.
(* On very cold days, a burner may start off burning weakly due to the temperature of the gas but should increase to its normal level as the engine warms up. This is quite normal)
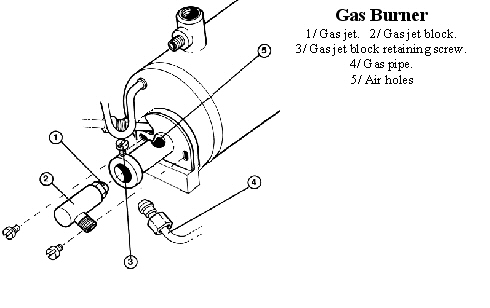
Carefully, disconnect the gas pipe from the jet block using a 2BA spanner.
Note when connecting or disconnecting the gas pipe and jet block, do not use excessive force. Always hold the end of the gas burner near the air holes to support it otherwise it is possible to cause damage by bending the body. Slacken the screw retaining the jet block and slide it out to the rear. Remove the jet from the jet block using a 4BA spanner. Wash out the jet in fast evaporating thinner (Cellulose or similar). Blow through the jet from the front, which should clear most blockages. Although the hole through the jet is tiny, if you hold it up to the light you should be able to see quite clearly if it is blocked or not. If in doubt, fit a new jet. A spare gas jet is included with the toolkit on all new models. Do not use wire to clean the jet as this can damage the precision hole and may upset the delicate balance of the gas system. Re-assemble in the reverse order, putting a small amount of PTFE tape or liquid pipe sealer round the thread of the jet before tightening it into the jet hoplder. Ensure all connections are tight. When re-positioning the jet block in the burner, ensure that it is pushed in as far as it will go.
The gas regulator has a spindle ‘O’ ring housed inside the body which may need lubrication from time to time if the control becomes ‘spongy’ in operation, making precise gas control difficult.
The full range of adjustment for normal burner operation is achieved within the first full rotation of the regulator knob, and it should only be unscrewed more than this for maintenance purposes and when the tank is empty, and their are no naked lights nearby.
To lubricate it, remove the knurled knob which is retained by a 4BA socket grub screw (.100” AF Allen key required) in the side. This grub screw is accessed by first removing the brass lever which is screwed into the same hole.
Beneath the knob is a back-lash spring and PTFE washer which will slide off the spindle.
Unscrew the hexagon retaining nut then screw the spindle out of the body.
The ‘O’ ring can now be lubricated.
Replace the spindle followed by the retaining nut. Slide the PTFE washer and backlash spring over the spindle and replace the knob. Note that the grub screw that holds the knob in place tightens into a groove near the end of the spindle and should be in a position that allows the side handle to be screwed in and operate the regulator without fouling other controls or the cab side.
Roundhouse Engineering Co. Ltd., Doncaster, UK. 2018. Click Here To Return To The Homepage