This is an updated version of an article by Roger Loxley that first appeared in 'Steamlines' magazine in the 1980's and in 1995 was also published in book form by Sidestreet Bannerworks Inc. Drawings in figures 2 and 3 by Marc Horovitz.
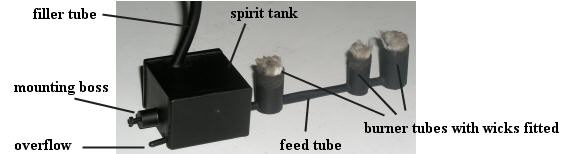
The simplest and most commonly used spirit (also called alcohol or meths) burner is shown in figure 1. A tank containing the spirit has a small-diameter feed tube emerging from its base, This carries the fuel forward and is connected to the bottoms of the burner tubes, the number of which can vary depending on the model. When the tank is filled, the spirit feeds all the wicks freely. Note that the top of the burner tubes must not be lower than the top of the tank, or the tubes will flood when the tank is filled.
Figure 1 Simple spirit burner
The tank must have an air vent and overflow in the top. Otherwise, a vacuum will be created in the tank as the level of spirit falls, which will eventually stop the flow. The vent also acts as a relief valve to allow vapor to escape if the tank becomes hot. On the Roundhouse burner shown, the overflow is a small bore tube exiting at the bottom, that passes internally to the top of the tank.
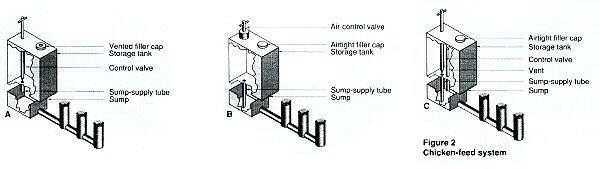
Figure 2 Chicken feed system
The second type of burner is shown in figure 2. This is commonly known as a "chicken feed" and it is found in a number of different variations. Variation 'A' simply has a control valve on the spirit outlet from the tank, to control the flow of spirit into the sump below. The sump then feeds the burners as in figure 1. The tank must, have an air vent on top. Variation 'B' has a valve on the air vent to control flow by restricting the amount of air entering the tank. Variation 'C' (the safest type) is as 'A', but also has an automatic cutoff to prevent the level of spirit in the sump from getting too high and overflowing. This is achieved by taking an air-vent pipe from the top of the inside of the tank, down into the sump. When the level rises and spirit covers the bottom of this tube, it prevents air from entering the tank and cuts off the flow of spirit from the tank until the level in the sump has dropped.
There are other variations on this type of layout but the ones shown should give you an idea of how it works. With this system a certain amount of control over the flame can be had by altering the rate of flow of the spirit.
Whether the simple type (figure 1) or chicken feed (figure 2) is used depends largely on the loco being modeled. On most engines, the simple type is best, particularly if used on outside-framed locomotives, where there is ample space between the frames for the tank, with an air space all around. This air space is most important, as the spirit in the tank should not be allowed to get too hot. The chickenfeed system may be used where space between the frames is limited; the tank can be mounted above the footplate, where there is usually more room.
Whichever system of feed is used, the burning of the fuel is subject to the same laws. (There are also various types of vaporizing burners, but as their operation is different and they are not commonly found in l6mm-scale engines, they will not be discussed here.) How a burner performs is affected by variables that can normally be easily controlled. I say "normally" because if a burner has been properly designed and constructed, taking into account the needs of the particular loco, then all will be well. If not, however, then no amount of cursing and gnashing of teeth will get it to work right. This where many mistakes are made. A spirit burner looks so simple to make that forgetting and disregarding the science behind it is easy to do. All comments on the control of the fire are made on the assumption that the burner is capable of working correctly in the first place.
A spirit burner should not flare up, smell foul (although a certain amount of odor is unavoidable), or set fire to your track and if it does then something is wrong.
The primary way of controlling the fire is by wick adjustment. I will start by saying that wicks should never be thought of simply as bits of string that burn. If you get it fixed in your mind that they are actually control valves, you are halfway to getting your loco to run properly.
Let me explain this a little. When the tank is filled with spirit, the fuel is first forced up through the wicks by atmospheric pressure acting on the surface of the alcohol in the tank and, as the level drops due to the burning at the wick, by capillary action. Either way, the fuel gets to the tip of the wick by passing through air spaces between the wick strands. It follows, then, that the flow can be varied by increasing or decreasing these spaces. In simple terms, this means loosening the strands or packing them tighter. Once the spirit has reached the top of the wick, it has to do something and, if the fire is lit, that something is to burn. If the valve (tightness of wick) is correct, then all the fuel that reaches the top will burn off efficiently. If the valve is open a little too much, the spirit will still burn, but this time a certain amount of unburned vapor will be carried off into the air, giving an unpleasant smell.
However, if the valve is open way too much, the spirit that cannot be burned up quickly enough has no option but to overflow and run down the side of the tube where, at best, it dribbles onto the track, leaving pools of burning liquid behind it. At worst, fire will run along the feed tube and engulf the whole engine in flames. The secret is to set your burner to have the smallest flames possible consistent with producing enough steam to run the loco without it running short. Any excess is simply waste. Do not be tempted to just stick some wicks in and if the loco runs, leave it at that. Take some time and care over the setting and it will pay dividends in the end.
Choice of wick material is important but somewhat restricted now. Asbestos string was the normal and preferred choice as it had an extremely long life and gave excellent results. Regrettably, this is not really an option any more due to safety considerations. There are modern substitutes, often made from ceramic or cotton based fibers. Ceramic fiber wicks do work, but they are not as easy to control or adjust. The nature of the fibers will often mean that the spirit is carried through at quite a fast pace leading to flooding or over fueling the flame. They also have a tendency to 'glaze' on the top (burning) surface after a while which forms a hard skin that prevents correct burning and will need regular replacement. Cotton based wicks are much easier to control but will burn away relatively quickly and again, will need replacing quite regularly.
When setting up a new burner, always adhere to the following routine.
1/ Cut a number of lengths of wick material about 3mm longer than the burner tube, and put a sufficient number in each tube so that they just fill it without being forced in. When using asbestos, wet the material with water or spirit to prevent the fiber from drifting in the air.
2/ Fill the tank, watching the wicks to see how the spirit appears at the top. If it arrives too quickly and over flows, then the wick is too loose and needs packing down a little with a pair of tweezers. Aim to get the whole wick damp by the time the tank is full. If any part of the wick is still dry, ease out a strand of string with the tweezers.
3/ Once satisfied that all looks well, light the wick and let it burn for a few minutes to settle it down. Now you can set each individual flame to the right height, shape, and color, again by using the tweezers to either pack or loosen the wick. To begin with, aim to have each flame no more than one inch high, of a uniform teardrop shape, and with a bluish flame. The type of wick used can effect this, as can new wicks that have just been fitted. When the flame is right, let it burn for a further ten to fifteen minutes to settle the wicks. On the subject of flames, don't be tempted to have long straggly wicks that burn with large, uneven yellow flames. In this case, big is not better. You will probably find that when this type of flame is put under the loco, your eyes will run whenever you go near it. It's all that unburned spirit vapor again, causing complaints from everyone and costing you money. Set your wicks to stick up above the top of the tubes 3mm or less.
4/ Only when satisfied that all is burning should you attach the burner to the loco to see how it performs in service. The burner is affected by the available air, which is different when the burner is fitted to the loco (with its surrounding body work and firebox) than when it is burning freely in the open. It may be necessary to remove the burner again if the rate of steam production is not right. Once set, however, it need not be disturbed for quite some time.
If, after the burner has been set correctly, the loco does not produce enough steam, you must look elsewhere for the trouble, which brings us back to design. If it is necessary to have the flames so large that they burn uncontrollably, with flaring, dribbling, and odor, in order to give sufficient steam, then something is very wrong. Either there is insufficient heating area (which could be increased by additional burner tubes) or, more likely, the heat is not all going where it should - to the boiler.
On a typical side-tank loco, where no means of directing and containing the heat other than the outer shell of the loco is used, a large proportion of that heat is, by means of radiation and conduction, being used to heat up some 5 or 6 pounds of metal (a typical 0-4-0). This, in turn, is constantly giving off its heat to the surrounding cold air, so a lot of your precious fuel is heating up the air in your garden.
What is needed here is a firebox.
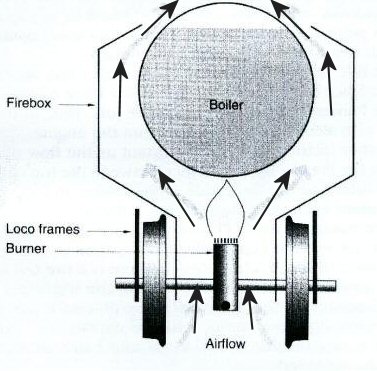
Figure 3. Firebox schematic
This is an enclosure around the boiler that not only keeps the heat where it is needed but has the added advantage of keeping out unwanted drafts that could extinguish the fire. Of course, a through flow of air is needed to allow the fire to burn properly. This is accomplished by having the top and bottom of the firebox open so there is a vertical flow of air past the burners. There is quite an art to getting the right proportions for this through flow of air and there are mathematical formulas covering it. Most modelers will however tend to work from past experience and from what they know functions well, plus a little trial and error.
Figure 3 shows a cross-section through a typical firebox to illustrate the principle. The ends of the firebox are closed off. In order to minimize heat conduction through the loco, minimal contact between the firebox and frames is essential. On Roundhouse locos, the firebox touches the frames at only four places and the area of contact at each point is only 1.6mm x 0.75mm There is no other contact with the rest of the loco except the boiler and steam pipe.
The use of a well-designed firebox also has another benefit. Since the burner heats the boiler more efficiently, smaller flames can be used to do the job. This, in turn, means less spirit is necessary to run the engine.
The flow of air through the firebox can be controlled by the two top side flaps which, by altering the width of the gap between the flap and the boiler, effectively controls the speed at which the hot gasses can exit. By closing these 'vents', the flow of air up through the firebox is slowed, allowing more of it's heat to pass to the boiler and by opening the 'vents', the opposite occurs. There are other forces at work here too just to complicate things. To start with, the heat rising from the burner and up through the firebox creates an air flow that draws cold air in through the bottom to help fuel the fire and, as the volume of hot gasses exhausting the top increases, so does the amount of cold air drawn in at the bottom. The principal is very simple, but in practice it can be a little tricky to get the right balance.
Setting the gap too small will keep more heat in the firebox but will also mean that too little air is drawn in at the bottom so the fire will burn very inefficiently. This can show up in several ways such as - inability to produce enough steam, bad odor and even the possibility of a halo of fire over the top of the boiler. This latter phenomena is a result of to little air reaching the burning wicks and the excess, un-burnt gas exiting the top 'vents'. It then igniting over the top of the hot boiler as it mixes with the now plentiful air supply.
Setting the gap too large will allow the heat to exit the top of the firebox too quickly, before it has had chance to pass enough to the boiler. This will also draw too much cold air in the bottom which further cools things down. This will also show up as an inability to produce enough steam and can also produce a halo of flame above the boiler but in this case it's more likely to be the flames being drawn up by the fast flow of air and gas up round the boiler.
The trick is to get the 'vent' gap just right so that the following happens all in one smooth process.
1/ The fire burns cleanly and efficiently by drawing in just enough air at the bottom.
2/ It passes as much of it's heat to the boiler as possible by traveling at the correct speed up through the firebox.
3/ Complete combustion of all the spirit vapour has taken place by the time the waste gas exhausts via the top 'vents'.
Generally, it is down to trial and error to get the 'vent' gap set correctly and time spent running and trying different settings whilst observing the effects will soon pay off. Note that changing wick material will often benefit from a slight adjustment to the gap as the fires behavior and requirements may change.
Another factor equally as Important as the flow of air through the firebox is the distance between the top of the burner tube and the underside of the boiler. In fact, this is important even on a loco without a firebox. If the burner is stuffed up very close to the boiler and there is not enough combustion space, then incomplete combustion of the spirit occurs. There is a fire but it is a poor worker; it has difficulty boiling the water but is good at producing the bad smell. Any pipework passing through the fire area should also be considered, especially if a superheater coil is used, and extra air space should be provided.
By ensuring that the burner wicks and firebox are correctly set up and working together will ensure that you get the most out of the system.
A word should be said about the fuel itself as this can also be a problem.
In the UK (and possibly worldwide) 'Methylated Spirit' has become increasingly difficult to buy as it's use as a fuel in other fields has diminished and safety considerations have risen. The 'meths' that is available is often of poor quality and contains many impurities and additional chemicals. Getting good quality can be a bit hit and miss so once a good supplier is found, stick with them.
Poor quality 'meths' will often burn with a very green flame and, over a very short period, a green deposit will build up over the boiler and fittings within the fires reach.
Always avoid poor quality fuel as it will have a detrimental effect on the performance of the firing system.
Another things that can reduce the ability to produce sufficient steam is the build up of deposits both inside and outside the boiler.
Internally, lime scale can build up over a period of time forming a thick layer of hard material which can interfere with the passage of heat through the boiler shell to the water. How long this takes and how thick a layer builds up depends on the water being used. It is good practice to remove this scale periodically using a kettle de-scaler or other suitable chemical. Even household vinegar can be used for this.
Externally, carbon deposits can build up on the outside of the boiler shell inside the firebox.
This is often caused by the oil in the exhaust steam and water which falls onto the boiler during operation, particularly when initially clearing the cylinders of condensate at the start of a run. The water content evaperates, but the oil will run down onto the bottom of the boiler where it is burnt in the fire and, over time, can build up as quite thick layer of carbon.
This should also be removed periodically.
The efficiency of the locomotives fittings, cylinders and valve gear must also, not be overlooked. If steam is being wasted due to worn parts/seals, leaking safety valves, slide valves leaking past and just general wear, then no end of tweaking of the burner will help. Don't blame the firing system for not producing enough steam if the problem is actually that you are wasting a fair proportion of what you are getting.
I hope this has given you some helpful tips on getting the most out of your spirit-fired locos. Perhaps this will help some of you get more pleasure and less trouble from your engines.
Roundhouse Engineering Co. Ltd., Doncaster, UK. 2018. Click Here To Return To The Homepage